In this blog post, we’ll explore how to implement two custom object property validators using TypeScript decorators. While popular libraries like class-validator already provide a rich set of decorator-based validators, our goal here is to demonstrate how to build your own—specifically, a @Positive validator and a @NotEmpty validator—in a clean and reusable way.
At the time of writing, decorators are still considered an experimental feature in TypeScript. This means future changes to the decorator specification may not be backward compatible. Decorators are essentially special annotations that can be applied to classes, class members such as properties and methods, and even function parameters. When a decorator is used, the TypeScript compiler expects a corresponding decorator function to be defined. This function is invoked at runtime and receives metadata about the decorated element. In this article, we will focus specifically on class property decorators.
This article is structured as follows: Section I outlines the design of the object property validator. Section II covers the implementation details. Finally, Section III provides a practical example demonstrating how to use the validator in a real-world scenario.
I Design
The design of the property validator is depicted by the class diagram below.
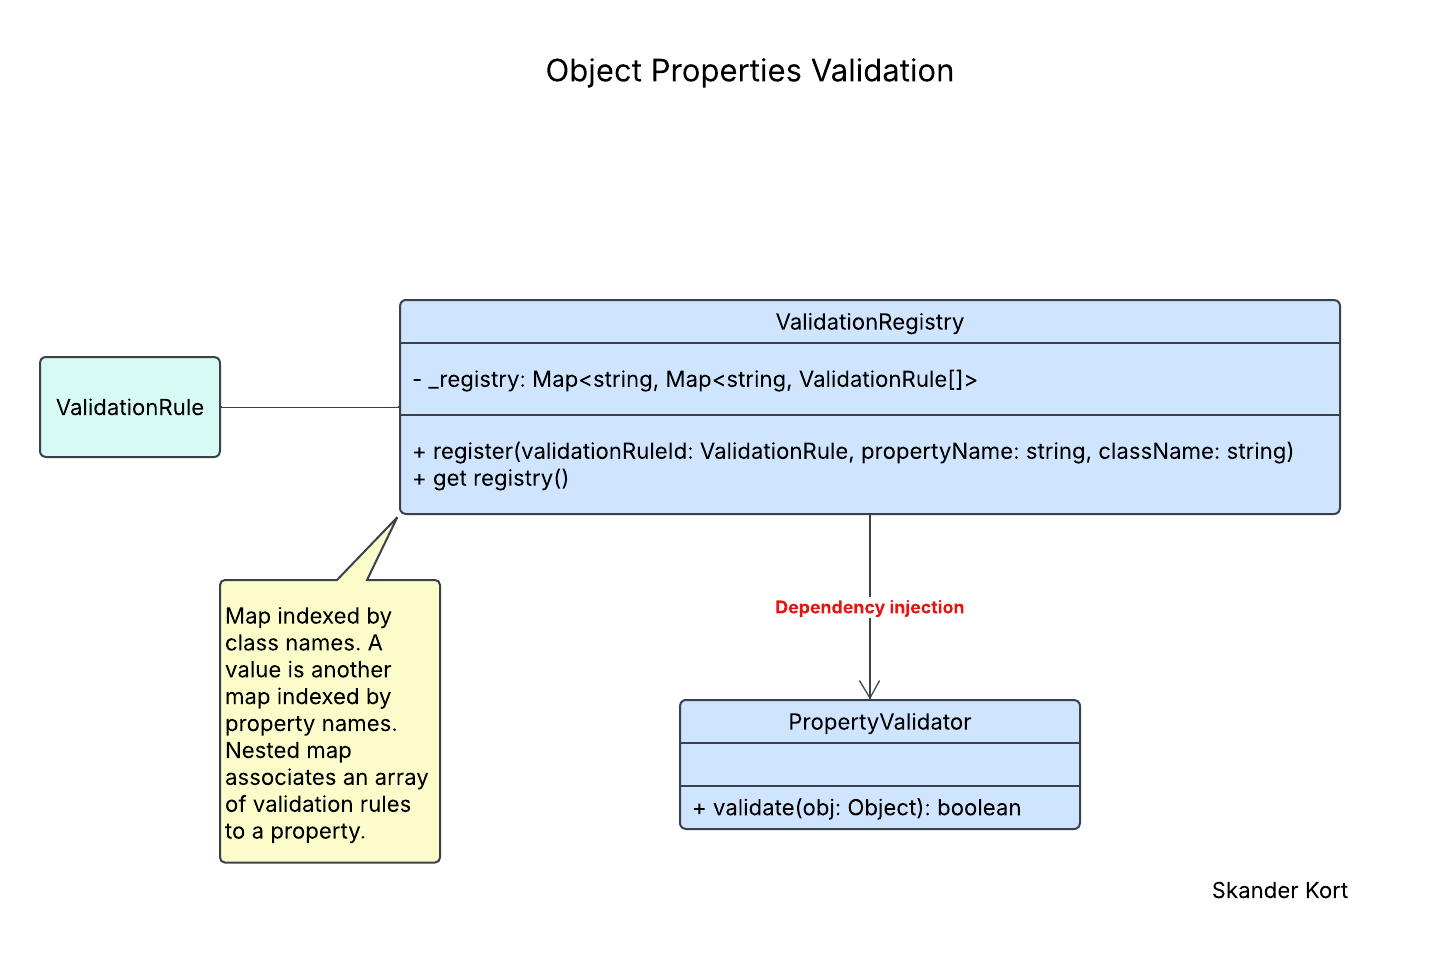
Validation rules are represented using the ValidationRule type or class. The ValidationRegistry class serves as a centralized store for all validation rules defined within the project. Internally, rules are stored in a private Map named _registry. This map is keyed by the names of TypeScript classes. Each class entry maps to a nested Map that is keyed by property names. Each property name, in turn, maps to an array of validation rules—these are the constraints that values of the corresponding property must satisfy. For example:
[["Person", ["name", ["NotEmpty"]]] New validation rules are added to the registry by invoking the register() method. The actual property validation is handled by the PropertyValidator class. To adhere to the Separation of Concerns principle, an instance of ValidationRegistry is injected into each PropertyValidator, allowing it to access the registered rules without managing them directly.
While it would have been possible to define interfaces for both ValidationRegistry and PropertyValidator to enforce the Design by Contract principle and decouple the validator from a specific implementation, we chose not to do so in order to keep the design simple and focused.
II Implementation
Let’s begin implementing the classes shown in the design diagram above, starting with ValidationRule. TypeScript enums provide a clean and expressive way to represent different validation rules.
 export enum ValidationRule {
    NotEmpty,
    Positive,
  }
Next, let’s implement the ValidationRegistry class.
 export class ValidationRegistry {
    private _registry: Map<string, Map<string, ValidationRule[]>> = new Map();

    register(
      validationRuleId: ValidationRule,
      propertyName: string,
      className: string
    ): void {
      if (!this.registry.has(className)) {
        this.registry.set(className, new Map());
      }

      const classValidationRules = this.registry.get(className)!;
      if (!classValidationRules.has(propertyName)) {
        classValidationRules.set(propertyName, []);
      }

      const propertyValidationRules = classValidationRules.get(propertyName)!;
      if (propertyValidationRules.indexOf(validationRuleId) == -1) {
        propertyValidationRules.push(validationRuleId);
      }
    }

    get registry() {
      // It is still possible for a client to update the registry directly.
      return this._registry;
    }
  }
The private property _registry was introduced in Section I. The register() method allows new validation rules to be added to the registry. It ensures that an entry exists for the target class and that the corresponding nested map includes the target property. Finally, it checks whether the specified validation rule is already associated with the property. If not, the rule is added to the list of validations for that property.
The implementation of the main class, PropertyValidator, is shown below.
export class PropertyValidator {
    constructor(private validationRegistry: ValidationRegistry) {}

    validate(obj: Object): boolean {
      const className = obj.constructor.name;
      if (!this.validationRegistry.registry.has(className)) return true;

      const validationRulesByProperty =
        this.validationRegistry.registry.get(className)!;

      let isValid = true;
      for (const propertyName in obj) {
        const propertyKey = propertyName as keyof typeof obj;
        isValid =
          isValid &&
          this.validatePropertyValue(
            propertyName,
            obj[propertyKey],
            validationRulesByProperty
          );
      }

      return isValid;
    }

    private validatePropertyValue(
      propertyName: string,
      propertyValue: any,
      registry: Map<string, ValidationRule[]>
    ): boolean {
      const maybeValidationRules = registry.get(propertyName);
      if (!maybeValidationRules) return true; // No validation is set for this property.

      for (const ruleId of maybeValidationRules) {
        switch (ruleId) {
          case ValidationRule.NotEmpty:
            return (propertyValue as string).length > 0;
          case ValidationRule.Positive:
            return (propertyValue as number) > 0;
          default:
            return true;
        }
      }

      return true;
    }
  }
The PropertyValidator class exposes a single public method: validate(). Let’s walk through its implementation. As expected, the validate() method returns true if no validation rules are registered for the target object. Otherwise, it iterates over each property of the object and delegates validation to a private method, validatePropertyValue(). An object is considered valid only if all of its properties satisfy all associated validation rules.
The validatePropertyValue() method returns true if no validation rules are associated with the given property. If validation rules are present, the method iterates over them and evaluates each rule based on its identifier.
Finally, let’s implement the callback functions associated with our custom property decorators: @Positive and @NotEmpty. Each callback is responsible for registering the corresponding validation rule for a specific property of a given class within the ValidationRegistry.
export const theValidationRegistry = new ValidationRegistry();

export function NotEmpty(target: any, propertyName: string) {
    theValidationRegistry.register(
      ValidationRule.NotEmpty,
      propertyName,
      target.constructor.name
    );
  }

  export function Positive(target: any, propertyName: string) {
    theValidationRegistry.register(
      ValidationRule.Positive,
      propertyName,
      target.constructor.name
    );
  }
III- Using The Property Validator
In this section, we’ll demonstrate how to use our custom property validator to validate instances of a model class named Project.
export class Project {
  public readonly id: string;
  @NotEmpty
  public readonly title: string;

  @NotEmpty
  public readonly description: string;

  @Positive
  public readonly contributorsCount: number;

  constructor(
    aTitle: string,
    aDescription: string,
    aContributorsCount: number
  ) {
    this.id = Math.random().toString();
    this.title = aTitle;
    this.description = aDescription;
    this.contributorsCount = aContributorsCount;
  }
}
A Project has four properties: id, title, description, and contributorsCount. Using our custom decorators, we specify that both title and description must not be empty, and that contributorsCount must be a positive number. We then create an instance of PropertyValidator to perform the validation.
export const theValidator = new PropertyValidator(theValidationRegistry);Finally, we can use the validator as follows.
const project = new Project("Implement property validator", "Implement property validator using TS decorators. Restrict to @Positive and @NotEmpty validation rules.", 2);

const isProjectValid = theValidator.validate(project);

console.log(`Is the project valid? ${isProjectValid}`);
The decorators implemented in this article do not accept any parameters. However, it is possible to create parameterized decorators using decorator factories. A decorator factory is a higher-order function that returns a decorator function, allowing parameters to be passed when the decorator is applied.